Safety


Which OSHA Regulations Require a Written Plan / Program?

osha written program template sample

When OSHA considers a safety or health hazard to be serious, the agency usually requires written documentation of the steps an employer takes to reduce the risk of injury or protect workers from the hazard. OSHA typically terms this requirement as a written plan (interchangeably known as a written program). While OSHA may reference the need for a program in various regulations, that doesn’t necessarily mean that a business must have that in the form of a written program (think hearing conservation – OSHA says you need to have a program, but does not say that it has to be written).

OSHA Regulations Requiring Written Programs

The following list of general industry regulations require written programs:

  • Hazard Communication (HAZCOM) – 1910.1200
  • Lockout/Tagout (LOTO / Control of Hazardous Energy) – 1910.147
  • Respiratory Protection – 1910.134
  • Process Safety Management (PSM) – 1910.119
  • Personal Protective Equipment (PPE) – 1910.132
  • Bloodborne Pathogens (BBP) – 1910.1030
  • Emergency Action Plans (EAP) – 1910.38
  • Permit Required Confined Spaces (PRCS) – 1910.146
  • Hazardous Waste Operations & Emergency Response (HAZWOPER) – 1910.120
  • Electrical Safety – 1910.304 & 1910.333
  • Fire Prevention Plans (FPP) – 1910.39
  • Laboratory Chemical Safety – Chemical Hygiene Plan (CHP) – 1910.1450
  • Commercial Diving Operations – 1910.420
  • Powered Platforms for Building Maintenance EAP – 1910.66
  • Asbestos – 1910.1001
  • Lead – 1910.1025
  • Silica – 1910.1053

Free Sample OSHA Written Program Templates

If you are looking for sample programs for some of the regulations that require written programs or plans, feel free to download a copy and modify as you see fit.


OSHA Top 10 Citations: 2011-2020

OSHA Top 10 2011 - 2020

2020 OSHA Top Citations – Same as 2019

OSHA announced it’s preliminary findings for the most cited standards for 2020, as revealed in a recent webinar with Safety+Health magazine. Not surprisingly, there were no changes from the 2019 list, with Fall Protection ranking Number 1 for the 10th straight year. Other notable changes were Respiratory Protection (1910.134) jumping to Number 3 from Number 5, Ladders (1926.1053) moving from Number 6 to Number 5, and PPE Eye & Face Protection (1926.102) moving from Number 10 to Number 9.

2020 OSHA Top 10

  1. Fall Protection – General Requirements (1926.501): 5,424 violations
  2. Hazard Communication (1910.1200): 3,199
  3. Respiratory Protection (1910.134): 2,649
  4. Scaffolding (1926.451): 2,538
  5. Ladders (1926.1053): 2,129
  6. Control of Hazardous Energy – Lockout / Tagout (1910.147): 2,065
  7. Powered Industrial Trucks (PITs) (1910.178): 1,932
  8. Fall Protection – Training Requirements (1926.503): 1,621
  9. Personal Protective (PPE) and Life Saving Equipment – Eye and Face Protection (1926.102): 1,369 
  10. Machine Guarding (1910.212): 1,313

Little Change over a 10 Year Period

As you can see from the graphic above (larger version here), only 12 standards have reached the Top 10 over the last decade, with the only changes being:

  • Added:
    • Fall Protection, Training (1926.503)
    • PPE, Eye & Face Protection (1926.102
  • Removed:
    • Electrical, Wiring Methods (1910.305)
    • Electrical, General (1910.303)

Inspections Down in 2020

Inspections by OSHA were down in 2020, primarily due to the impact of the COVID-19 pandemic, and nearly 39% below 2015 levels.


Free eTool: Industrial Hygiene Exposure Assessment Characterization

industrial hygiene exposure assessment decision matrix

Anticipate, Identify, Recognize

When starting an occupational exposure assessment, the first step a practicing industrial hygienist must do is be able to anticipate, identify, and/or recognize workplace hazards so that stressors that may impact employee health can be evaluated later in the assessment. Understanding the workplace, how chemical and physical agents are generated and the existing control measures (e.g. engineering controls) in place, help the industrial hygienist to develop an effective plan for evaluating risks.

IHEST – Industrial Hygiene Exposure Scenario Tool

AIHA has released the free IHEST (Industrial Hygiene Exposure Scenario Tool) which helps an industrial hygienist to identify and capture basic exposure potential data, for the purpose of improving evaluation accuracy in the assessment process. The tool includes prompts for:

  • Process Overview
  • Task Description
  • Exposure Controls
  • Similar Exposure Groups
  • Employee Tasks
  • Ventilation
  • Room layout
  • Airborne concentrations
  • Dermal exposures, and
  • Noise exposures

Download a copy of the AIHA IHEST from AIHA’s website or without macros below.

Source: AIHA

Statistical Analysis of Health & Safety Data – IHSTAT

Are you looking for statistical analysis of health and safety data (e.g. number of measured occupational exposures that exceed established OELS)? Take a look at OHShub.com’s post on IHSTAT, where you can download AIHA’s excel worksheet that can perform some basic statistics for you.


Can Scaffolding be Used as a Fall Protection Anchor Point?

scaffolding as a fall protection anchor point

Fall Protection Systems – Most Cited, High Risk

Again this year, Fall Protection is #1 in the most frequently cited standards. Combine this fact that 17% of all work related fatalities are related to falls, slips and trips (second only to transportation incidents at 40%) and you can see the importance of ensuring a complete fall protection system is in place to protect our employees. A complete fall protection system can look a number of different ways, including: guardrail systems, safety net systems, and personal fall arrest systems. Scaffolding, when built and used correctly, are considered a guardrail system when completely erected and all safety measures are in place.

Scaffolding & Personal Fall Arrest Systems

Often in industry and construction, employers require the use of a personal fall arrest system (PFAS), more commonly thought of as a harness and lanyard, in two situations when working from scaffolding: 1) because they have a site-wide policy requiring it to be used 100% of the time, or 2) because the scaffolding is incomplete and is missing an element to would classify it as a guardrail system (e.g. top rail missing, one side missing, no swing gate, etc.), resulting in the need to use a combination of approaches (i.e. partial scaffolding & PFAS).

incomplete scaffold tag

ABCD of Personal Fall Arrest Systems

Recall A, B, C, D’s for a personal fall arrest system PFAS.

  • Anchor (rated at least 5,000 pounds per employee or certified and engineer to have a safety factor of two times the applied load).
  • Body Support (full body harness to distribute the load over the entire body).
  • Connecting Devices (think self retracting lifelines or shock absorbing lanyards).
  • Descent / Rescue (what are the tools and training to ensure a safe descent?).

Can Scaffolding be Used as an Anchor Point?

So if we have an employee working from incomplete scaffolding, and we need to ensure a complete fall arrest system, one of the most difficult considerations often focuses around the anchor point. With the most common question being,

Can scaffolding be used as a suitable anchor point? or, Can I tie off to scaffolding with my lanyard?

OSHA addresses this question in a number of letters of interpretation (LoI) for 29 CFR 1926.502 (Fall Protection Systems Criteria and Practices). Below are a few excerpts from some of their LoI.

Does the OSHA Standards Prohibit Tying Off to a Scaffold?

04/11/2005 Q. Do the OSHA standards prohibit tying off to a scaffold?

A. No… It is OSHA’s position that scaffolding can function as a suitable anchorage for fall arrest systems when the scaffolding section so used is erected and braced such that the criteria of §1926.502(d)(15) are met. This applies whether the scaffold is partially built (i.e., being erected or disassembled) or completely built.

Keep in mind, the response states that the criteria of 1926.502(d)(15) must be met. Those criteria include:

Anchorages used for attachment of personal fall arrest equipment shall be independent of any anchorage being used to support or suspend platforms and capable of supporting at least 5,000 pounds (22.2 kN) per employee attached, or shall be designed, installed, and used as follows: as part of a complete personal fall arrest system which maintains a safety factor of at least two; and under the supervision of a qualified person.

OSHA 1925.502

Can Scaffolding function as a Anchorage Point for PFAS?

OSHA is again clear in stating that scaffolding can serve as a suitable anchor, IF, certain conditions are met: it meets the requirements of 1926.502(d)(15).

04/02/1998

It is OSHA’s position that scaffolding can function as a suitable anchorage for fall arrest systems when the scaffolding section so used is erected and braced such that the criteria of 1926.502(d)(15) are met. This applies whether the scaffold is partially built (i.e., being erected or disassembled) or completely built. The provisions of paragraph 1926.502(d)(15) require the anchorage (i.e., the scaffold) either to be capable of supporting at least 5000 pounds, or to be designed, installed, and used as part of a complete personal fall arrest system which maintains a safety factor of at least two.

You are correct that both safety factors — the two to one for the personal fall arrest system and the four to one for the scaffold components — must be maintained. However, the 4 to 1 factor for a component required by section 1926.451(a) applies only to the load which is actually applied or transmitted to the component, not to the total load placed on the scaffold.

While the typical erected scaffold may not withstand the forces imposed by an arrested fall, with proper engineering, a scaffold can be designed so that its components are adequately braced or supported to support such loads. A scaffold should never be used as an anchorage point for a fall arrest system unless it has been properly evaluated by a competent person.

emphasis added

In summary, you must have a competent person “sign-off” on the scaffolding prior to using it as anchor.

Do Scaffolding Manufacturers Allow You to Tie-Off to Their Complete System?

According to Mr. Michael D’Alessio, Director of Engineering at Patent Construction Systems, in the 02/14/1996 LoI, he states,

“No scaffold system in existence in the world today is designed to safely support the kinds of loads that would be imposed upon them by fall arresting systems. For this reason, every major United States manufacturer of scaffolding has signed a letter to the users of our equipment warning against such attachment.”

OSHA responds with an understanding of the concern and reiterates the requirements of 1926.502(d)(15), stating,

“With respect to the question of whether or not scaffolds can be used as anchorage points for personal fall arrest systems, please be advised that we understand the Scaffold Industry Association and the Scaffolding, Shoring & Forming Institute are concerned that scaffolds and scaffold components have not been designed to accept the forces imposed by employee falls. We agree that during the erection and dismantling process the typical scaffold is unable to comply with the criteria of 29 CFR 1926.502(d)(15) which requires the anchorage (i.e. the scaffold) to be capable of supporting at least 5000 pounds per employee attached. The alternative anchorage criteria referenced in 29 CFR 1926.502(d)(15)(i) and (ii) (e.g. a system designed, installed and used under the supervision of a qualified person as part of a complete personal fall arrest system which maintains a safety factor of at least two) may be used if the partially erected or completed scaffold is considered a part of the complete personal fall arrest system criteria and is capable of resisting the forces involved should there be a fall.”

TLDR

In summary, OSHA does not prohibit tying off to scaffolding if the requirements of 1926.502.d.15 are met: anchor capable of supporting at least 5,000 pounds per employee attached, used as part of a complete personal fall arrest system which maintains a safety factor of at least two, and under the supervision of a qualified person.

Additional Reading

Also, check out 5 of the most common OSHA responses to scaffolding questions via OHShub’s post on OSHA Interpretations: 5 Responses to Scaffolding.


Human Performance – Error Precursors & Safety

Human Performance vs. Safety Management System vs. Behavior Based Safety

A lot of talk in the Safety world lately has focused on the theories of Human Performance, and how it may enable your organization to more effectively manage safety risks and ultimately keep your employees safe. As organizations continue to define and refine their safety processes, Human Performance is one method that combines the best of Safety Management Systems (e.g. ISO 45001) and Behavior Based Safety. When considering Human Performance, one of the key elements to address involves error precursors.

What is an Error Precursor?

In the simplest of terms, error precursors are conditions & behaviors that lead to errors. They are not mysterious or obscure and are typically known to employees and are observable (if you look for them). If they can be identified, they can be mitigated, thus reducing the risk of an incident and subsequent injury to employees.

As stated in the DOE Standard Human Performance Improvement, Error precursors typically fall into one of four categories:

  1. Task Demands
  2. Individual Capabilities
  3. Work Environment
  4. Human Nature

Common Error Precursors

Task Demands

  1. Time Pressure (in a hurry)
  2. High workload, mental pressure
  3. Simultaneous, multiple actions, multi-tasking
  4. Repetitive actions, mundane, monotony
  5. Irreversible actions (not necessarily a precursor, but often overlooked)
  6. Interpretation requirements, vague procedures, unclear procedures
  7. Unclear goals, roles, responsibilities
  8. Lack of unclear standards

Individual Capabilities

  1. Unfamiliar with task, first time, non-routine
  2. Lack of knowledge or proficiency
  3. New techniques not used before
  4. Poor communication
  5. Poor problem solving skills
  6. Unsafe attitudes
  7. Illness or fatigue, general poor health, injury
  8. Ability to handle stress

Work Environment

  1. Distractions and interruptions
  2. Changes from the routine
  3. Confusing displays, controls, signage
  4. Work-arounds
  5. Unexpected equipment conditions or response
  6. Personality conflicts
  7. Environmental factors (e.g. noise, temperature, lighting)

Human Nature

  1. Stress
  2. Habits
  3. Assumptions
  4. Complacency or overconfidence
  5. Mind-set (intentions)
  6. Inaccurate risk perception
  7. Mental shortcuts or biases
  8. Limited short term memory

Human Performance Safety Tools

When mitigating the error precursors identified in your organization, it’s vital to use tools that reduces human error via: increasing situational awareness, increasing mindfulness, increase risk assessment, increase self awareness, foster excellent communication, slow down activities to allow employees to think through the risks, provide for continuous improvement, and increases employee engagement.


Contractor Pre-Job Safety Checklist Template

Contractors in General Industry & Construction

With nearly 100 deaths per week (or 15 per day) on job sites around the United States, protecting our employees is more important than ever. For many years, contractors have typically made up the majority of the working population on construction sites, however, industry is seeing a rise in contractor populations onsite, often due to facilities becoming increasingly lean. Unfortunately, too often, owning organizations do not take the same level of ownership for the safety of contractors while they are working on their sites, which inevitably leads to an increase in injuries and illnesses.

Pre-Job Safety Checklist

The use of a pre-job safety checklist is one of the most valuable tools that an owning organization can utilize to ensure that a contractor is complying with the safety requirements of a job site. While it’s certainly not the only tool, it ensures that the safety priorities of the site are reviewed before the job commences. This provides a time for the contractor and their point of contact to discuss the job, expectations, safety implications, and mitigating factors. All crucial to ensuring that job goes well and personnel are kept safe.

The following pre-job safety checklist provides a starting point for organizations that do not currently utilize a pre-job safety review. While there may be portions of the template that are not applicable to your site, and other considerations that are not include, the checklist is provided in Microsoft Word format to allow for easy editing.

Download OHShub.com’s free Pre-Job Safety Checklist.


Simple Safety Action Item Tracking Log Template

What Get’s Measured, Get’s Managed

If your workplace is not tracking safety action items, you are missing a real opportunity to show progress, build culture, create a safer work environment, and manage your safety systems. As Peter Drucker is quoted as saying,

What get’s measured, get’s managed.

You don’t need to go out and pay hundreds of dollars per year, per user, or any variation thereof. Excel (or even Google Sheets) can be an effective method of tracking open safety action items and ensuring that those items move towards the ultimate goal of completion.

OHShub.com Free Template – Safety Action Item Tracking Log

OHShub has generated a quick excel safety action item tracking log that you can use within your facility. Modify it as you need to fit your work environment (add departments, person who identified, etc.).

The tracking log template includes conditional formatting, which highlights action items that are coming due (within 30 days) in ORANGE, and overdue items in RED. Completed items are GREEN. Additionally, the spreadsheet can be filtered by status, date, person responsible, priority, or any combination thereof.


How Does OSHA Define Bodily Entry – Confined Space

One of the common questions that OHShub is presented with is, “What does OSHA mean by ‘bodily enter’ when it comes to a confined space?” 

Is this even a confined space?

There are a few different questions here:  The first is defining what it means to “bodily enter” a space when we are looking to determine if that space even meets the OSHA definition of a confined space.  The second is, once we have defined a space as a confined space (or more specifically, a permit required confined space), what constitutes “entering a space.”

Complete body must be able to enter the “confined space”

In the preamble to the Permit Required Confined Space standard, OSHA is clear that for a space to meet the requirement of “large enough and so configured that an employee can bodily enter and perform assigned works”, you must be able to completely bodily enter it.  That is, put your whole body in the space.

While OSHA is concerned that spaces that are too small for complete bodily entry may pose hazards for employees, the Agency did not intend to cover such spaces under the permit space standard. OSHA believes that the NPRM preamble discussion of permit space incidents and of proposed provisions clearly indicates that the proposed rule was intended-to cover only spaces that were large enough for the entire body of an employee to enter.

Source: https://www.osha.gov/FedReg_osha_pdf/FED19930114.pdf

Therefore, as we are attempting to define whether a space is a confined space or not, if I can not put my whole body into the space, I do not meet one of the three requirements for defining as a confined space, therefore it is not a confined space and can not ultimately be a permit required confined space.

Be cognizant of other hazards in a space that is not a confined space

Now this does not mean that this space is “safe”, but far from it.  There may still be hazards associated with the space that we must mitigate to ensure our employees are safe when performing work within it, however, we don’t have to meet the requirements of the permit required confined space standard.

Take a look at OSHA’s Letter of Interpretation providing further guidance (emphasis added):

Scenario: The access to aircraft fuel cells (tanks) are approximately 12 inches wide but many feet in length. Workers remain outside the tank but have their upper extremities and, on occasion, their head extending into the tank to perform the required tasks. The aircraft fuel tank will be drained of its contents, purged of vapor, and monitored for gases and vapors.

Question: Would these tanks be considered confined spaces as defined by OSHA’s Permit-required confined spaces standard, 29 CFR 1910.146.

Reply: If it is possible for the employee to fit his or her entire body within the tanks, then they would be confined spaces under §1910.146. On the other hand, if an employee cannot enter the tanks with his or her entire body due to the size of the tanks’ diameters, then the tanks would not be considered confined spaces. An employee may still be injured or killed as a result of some atmospheric hazard within such a tank; however, the permit-required confined spaces standard is not intended to address all locations that pose atmospheric hazards. Please be advised that the procedures to protect workers from atmospheric hazards within these tanks would be required by other OSHA standards, such as Subpart Z of Part 1910 General Industry Standards.

Source: https://www.osha.gov/laws-regs/standardinterpretations/2008-03-05

Break the plane

The second part of understanding “bodily enter” or “bodily entry” is looking at it from the standpoint of a space that has been defined as a confined space, and more specifically, a permit required confined space.  If the space is question is a permit required confined space, simply breaking the plane of that space is considered entry, and must be done within the requirements as stated in the standard, to include permitting.

Summary: TLDR

Summary: TLDR: If I can’t put my full body in, it can’t be classified as a confined space, therefore bodily entry doesn’t apply. But, break the plane on a confined space, or permit required confined space, and I have bodily entered.


Combustible Dust Accumulations Allowed in the Workplace

If you work in an facility that creates dust, there are several questions you may be asking yourself regarding combustible dust, including:

  • How much dust am I allowed to have on surfaces? Is it 1/4 of an inch, 1/8 of an inch, 1/32 of an inch?
  • Am I at risk for a combustible dust explosion?
  • How do I test to see if my dust is classified as combustible dust?
  • How large of an area can have dust accumulations?
  • How do I determine if I can be cited by OSHA under the walking working surfaces standard (1910.22) or the material handling standard (1910.176).

Combustible Dust, Defined

First off, what is a combustible dust? CCOHS provides the following:

Essentially, a combustible dust is any fine material that has the ability to catch fire and explode when mixed with air. Combustible dusts can be from: most solid organic materials (such as sugar, flour, grain, wood, etc.) many metals, and some nonmetallic inorganic materials.


Some of these materials are not “normally” combustible, but they can burn or explode if the particles are the right size and in the right concentration.


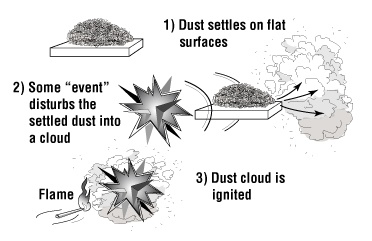
Therefore any activity that creates dust should be investigated to see if there is a risk of that dust being combustible. Dust can collect on surfaces such as rafters, roofs, suspended ceilings, ducts, crevices, dust collectors, and other equipment. When the dust is disturbed and under certain circumstances, there is the potential for a serious explosion to occur. The build-up of even a very small amount of dust can cause serious damage.

Canadian Centre for Occupational Health and Safety

Acceptable Accumulation Levels for Combustible Dust

The Combustible Dust National Emphasis Program references 1/32 inch dust accumulation levels, however this is based on some assumptions, including: uniform distribution of the dust and a bulk density of 75 lb/ft3. However, not all dust meets this density (some are lighter, some are heavier). NFPA 654 allows the dust accumulations to exceed the layer depth criteria of 1/32 inch according to the following equation for materials with bulk densities less than 75 lb/ft3.

Additionally, NFPA 654 states that a dust explosion hazard and dust flash fire hazard are deemed to exist in any building or room where any of the following conditions exists:

  • The total area of nonseparated dust accumulations exceeding the layer depth (LD) criterion is greater than five percent of the footprint area.
  • The area of any single nonseparated dust accumulation exceeding the layer depth (LD) criterion is greater than 1000 ft2.
  • The total volume of nonseparated dust accumulations is greater than the layer depth (LD) criterion multiplied by five percent of the footprint area.
  • The total volume of any single nonseparated dust accumulation is greater than the layer depth (LD) criterion multiplied by 1000 ft2.

Calculate Allowable Combustible Dust Levels

In order to calculate the level of dust accumulations that may be allowed at workplaces for combustible dust you must know the bulk density. Bulk densities depend on may factors, including the type of material (e.g. wood, paper, plastic, other organics, metal, etc.), the dust particle size, and the dust particle shape. However, OSHA compliance officers must take into consideration the bulk density of the dust prior to determining if there is a violation and subsequent citation.

Very low bulk density materials (e.g. paper dust and corn dust – 25 lb/ft3 and 16 lb/ft3, respectively), may not create a deflagration (heating until it burns away rapidly) hazard even at an accumulation level of 1/4 inch, covering over five percent of the floor area or 1000 ft2, whichever is less. Therefore, facilities should determine their dust bulk densities in order to determine the level of accumulation that does not present a combustible dust hazard.

One of the easiest manners to determine bulk densities is to use an online resource, such as:

The referenced bulk densities can then be plugged into the equation below to determine the allowed LD

Example – Allowed Dust Accumulation

For example, for paper dust with a bulk density of 25 lb/ft3, the layer depth criterion is approximately 1/10th of an inch.

Therefore, in this example, a dust explosion hazard and dust flash fire hazard are deemed to exist if:

  • The total area of non separated dust accumulation exceeding 1/10th of an inch over greater than 5 percent of the footprint area, or
  • The area of any single nonseparated dust accumulation exceeding 1/10th of an inch is greater than 1000 ft2, or
  • The total volume of non separated dust accumulations is greater than 1/10th of in inch multiplied by five percent of the footprint area, or
  • The total volume of any single nonseparated dust accumulation is greater than 1/10th of an inch multiplied by 1000 ft2.

How Does OSHA Evaluate Dust Accumulations?

It should be noted that OSHA compliance officers will only likely send samples out for bulk density determination if the material is light (e.g. paper dust, fabric fibers) and the levels of accumulation exceed 1/4 of an inch over 5% of the floor area of a room or building, of 1000 ft2, whichever is less.

However, if dust accumulations are documented to exceed one inch in depth (extending over 5 percent of the floor area or a room or building, or 1000 ft, whichever is less), samples of dust don’t need to be submitted for bulk density determination. The OSHA compliance officer can use the referenced sources as guidance to determine the approximate values for LD and can issue citations without the bulk density determination.

Source: OSHA – Evaluating Hazardous Levels of Accumulation Depth for Combustible Dusts


Guide for Developing Job Safety Analyses & Safe Work Procedures

While Administrative Controls may not be the most effective hazard control method, they are still extremely valuable to sustainable an lasting change in most organizations.

What is a Job Safety Analysis or Safe Work Procedure?

Job Safety Analyses (JSA) and Safety Work Procedures (SWP) (also known as job hazard analysis/analyses, pre job plan, safe work plan, etc.) are step by step instructions for doing work the right way. JSAs and SWPs identify the materials and equipment needed, how and when to use them, and usually include:

  • regulatory requirements;
  • personal protective equipment requirements;
  • training requirements;
  • responsibilities of each person involved in the job;
  • a specific sequence of steps to follow to complete the work safely; permits required;
  • emergency procedures.

Why Use a JSA or SWP?

JSAs and SWPs are generally prepared for jobs that:

  • are critical (high risk jobs where accidents have or could result in severe injuries);
  • are hazardous and where accidents occur frequently;
  • new or have been changed;
  • have had new equipment added;
  • require many detailed tasks;
  • involve two or more workers who must perform specific tasks simultaneously;
  • are done infrequently.

10 Steps to Create a Job Safety Analysis (JSA) or Safe Work Procedure (SWP)

  1. An easy way to develop a job safety analysis or safe work procedure procedure is to break the task into small steps. For each step, determine the hazards and ways to correct them. Some hazards to think about include: being struck by moving equipment; coming in contact with hazardous substances; hitting obstructions or other workers; becoming caught in machinery; falling; being struck by objects falling from above; suffering from exposure to toxic gases, insufficient oxygen or extreme temperatures.
  2. You can then use the breakdown of hazards and corrective measures to prepare a written JSA or SWP. Consider using the following process to develop your safe work procedures. List all jobs on your work sites that meet the criteria above. Concentrate on those that have potential for: serious injuries; frequent injures; severe property damage; significant interruptions to production; public liability; government intervention.
  3. Put the list of jobs in order by the degree of hazard they present and the frequency they are performed.
  4. Analyze each job by observing and interviewing workers. Record the following information: job name and location; each step of the job and its hazards; roles of each worker involved; special equipment required; applicable regulatory requirements.
  5. Determine the measures needed to control job hazards, such as: engineering controls to eliminate hazards; worker training; personal protective and safety equipment; hazard markings; safety meetings.
  6. If engineering controls or worker training can be used to permanently eliminate or reduce the impact of hazards, implement them.
  7. Prepare your safe work procedure by listing (in order of occurrence) each: step of the job; control measure required (excluding one time measures such as engineering controls and development of training); regulatory requirement; special equipment required; specific training requirement for workers (e.g., BOP Level l or journeyman electrician).
  8. Test the procedure in the field to ensure it: is accurate; meets regulatory requirements; is understandable to workers.
  9. Finalize the written procedure and place it at appropriate work sites.
  10. Train workers in the procedures.

7 Ineffective Safety Practices (and what to do instead)

Your Safety Management System (SMS) hitting a roadblock? Real safety culture change not occurring in your facility? Maybe you (and senior managment) are looking it all wrong. Here are few Do’s and Don’ts for improving the effectiveness of your safety program.

DO

  1. Focus on Leading Indicators – Know where you are going, not focus solely on where you have been.
  2. Reinforce Correct Behavior – Strengthen what’s working and discourage inappropriate behaviors within your Behavior Based Safety system.
  3. Focus on needs-based training – can’t do, train for fluency; won’t do – Change the consequences and ultimately the outcome – go beyond compliance.
  4. Speak with your Actions, not your Words – Demonstrate commitment and uphold integrity.
  5. Analyze and take Action – Avoid the blame game for past accountability lapses. Develop accountability processes that expect future results and hold true to them.
  6. Encourage Near Miss / Near Hit / Close Call Reporting – Some of your most valuable data can come from the data associated with near misses. Encourage reporting. Don’t place blame but use as a learning opportunity. As your program matures, so will the near miss reporting processes.
  7. Be a Safety Coach – Build on what is right in your safety program and don’t focus on what is wrong. Be an encourager and not a defeatist.

DON’T

  1. Focus on Lagging Indicators – While lagging indicators can let you know where you have been, they should not be your focus and road map on where your safety program and management system is going. Be proactive rather than reactive.
  2. Implement Injury based Incentive Systems – Injury based incentive systems can drive injury and near miss reporting underground, which can cause a false sense of hope. Additionally, OSHA has specifically addressed and discouraged these type of incentive programs.
  3. Rely Solely on Awareness Training – While awareness level training is important, it shouldn’t be the breadth of your training program. Use your data from DO #3 and focus on where your gaps and needs are. Spend your training capital there.
  4. Rely on Motivational Signs & Messages – “Safety Starts with You”, “Think Through It Before You Do It”, etc. At best, you get some (slight) short term benefit, if any. Signage is quickly ignored, overlooked, and blends in with the environment. Don’t depend on motivational signage as your safety culture booster.
  5. Force Compliance via Blame and Discipline – Nothing on this list more quickly puts safety shortcuts into the underground than the prevalence of blame and discipline within an organization. Don’t fall into the trap. Accountability, yes. A focus on Blame and Discipline, no.
  6. Discourage Near Miss Reporting – All incidents are not created equal. And this goes with near misses as well. Review your accountability methods to ensure you are not using DON’T #5 to discourage near miss reporting. Near misses must be treated as learning opportunities. Use them to your benefit.
  7. Be the Safety Cop – You don’t want people to comply just because you come walking through the facility. You want your employees to seek you out for assistance to safety questions or concerns. Without building relationship (coach) and by leading by force (cop), you will surely send your safety culture reeling.

Graphic Source: Aubrey Daniels International


Examples of Permissible Occupational Drug Testing

When can I perform drug testing in the workplace?

  • Random drug testing
  • Drug testing unrelated to reporting of work-related injury or illness
  • Drug testing under state workers’ compensation law
  • Drug testing under other federal law, such as US DOT regulation
  • Drug testing to evaluate root cause of workplace incident that harmed, or could have harmed, employees
  • Note: If the employer chooses to use drug testing to investigate an incident, the employer should test all employees whose conduct could have contributed to the incident, not just the employee(s) who reported injuries.

Source: OSHA